Thursday, December 27, 2007

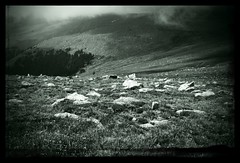
Sea of Glass, Tritone


I'm finally happy with this image. I took this shot two years ago and processed it then but haven't visited it much since, and I was never happy with the processing.

The full set of adjustments here is long, but the basics are: curves to boost brightness and tweak contrast, +saturation to bring out the reds and yellows, -saturation to make the sea more gray and neutral, separate black and white conversions for everything above the horizon and everything below, and then a final tritone and curves adjustment to arrive here. And an 8x10 crop. Oh and near the beginning I removed a large support pole in the foreground. :)

Wednesday, December 19, 2007

Noir


I love this look and this image. I really wanted to try something different with the lighting, so the key light is a 16x20" softbox to the model's right, aimed across her face. Then I used two hard lights (grids), one to put a splash of light on the back of her hair, and one to fill just a little in front and cast a slight shadow against the background.

The goal was to keep some softness in her face while still creating a hard lighting look overall. I love the kiss of light from the softbox on her near cheek, and the barely visible shadow against the background. I may need to kick the shadow edge contrast up a bit.

Saturday, December 15, 2007

Houston, from Houston


The moral of this story: carry your tripod! I didn't take it today... and as a result I had to hand-hold this (braced) at 1/6th to get the shot at a decent ISO (200), underexposing a bit. All but this one were too blurry.

But I love the shot, the setting sun made gorgeous golden light, reflecting off the buildings here.

Take your tripod!

Friday, December 14, 2007

House, Galveston, TX


There are some really beautiful houses in the Galveston neighborhood near the Strand... we had to park there to get to Dickens on the Strand, and I was really surprised to find all these incredible houses.

Something about this shot just felt vintage to me, so I went with a vintage/antique treatment.

Monday, December 10, 2007

Boy


I love this shot... the motion, the texture, the focus, the bokeh, etc. I wanted muted color tones, but not black and white. The muted tones allow the motion and texture to be the focus and not contrast or color. The emulsion border effect just adds to it IMO.

Maybe my favorite thing is the focus on his grip on the rock. It's the only thing in any real focus and brings out something raw or primal, in a subtle way. A boy hurling a stone is pretty universal, and to me that is most evident in his hand and grip.

Saturday, November 17, 2007

ASAP Foto


I want to plug a local photo lab who printed this image for me. This is our midwife and our three boys, and we were giving this to her as a gift. I process all my images on Apple's 30" Cinema HD display (color managed of course), and this image was adjusted on that display.

Here's the point: the ASAP print looked exactly like the image on my screen. Exactly. I was shocked, I always worry about printing with shadows that could go too dark. The background here is not black, nor was it on the print. The colors were vibrant and precisely what I saw on screen. No loss of shadow detail or darkening of shadows.

Very impressive!

I'm so impressed that I'm going to see if they have an FTP service and I will set up Automator to push images to them if they do.

ASAP's details:
(281) 980-6071
3356 Highway 6
Sugar Land, TX 77478

Friday, October 05, 2007

Baby Blue


Well it couldn't have been too long before new camera + new baby = new studio shoot. :)

Shot with my new 40D and 17-40L, 1/250 @ f/16.

This was lit with three lights and a reflector... I was shooting just underneath a medium softbox, almost at ground level... there's a beauty dish overhead (over the scene), not far out of the frame, and then one 10-degree grid spot. To camera right is the gold side of a Litedisc. Lights triggered by a sync cord and optical slaves.

I did a little skin tone cleanup in Photoshop and a little blurring on the background to squish imperfections in the paper, but otherwise this is as shot.

Sunday, September 30, 2007

New Babies


My Canon 40D arrived this week, as did our new baby boy!

I love the 40D, it's a huge upgrade from the 10D (about time). I now have the capacity to shoot far too many frames a second (6.5) for far too long (75 JPEGs). Of course I barely ever use the "motor drive" at all now, I probably won't suddenly have occasion to. But, it will make studio work much less frustrating. I won't be waiting for the camera anymore, I don't think.

For the birth, I put one of my monolights in the bedroom (we birthed at home), with a shoot through umbrella, aimed at about 45 degrees up. Thus most subjects had feathered direct light from the edge of the umbrella and bounced light off the ceiling. It worked pretty well as an unobtrusive, light-everything solution.

Monday, September 17, 2007

Escape


We had a Houston Flickr meetup yesterday and we went shooting downtown, along Main Street. This is the Montagu Hotel, an old hotel one block off Main which is scheduled for demolition (along with everything on its block) very soon.

I got to play with my 17-40 f/4 L and it was ideal for shooting this fire escape. I applied a tritone to this in Photoshop CS3 and then added the border effect, which parallels the ladder portion of the fire escape at the bottom. I also like the effect on the top border of the image... the border effect enhances the "into infinity" feel IMO.

I think this is one of my favorite images in a while.

Monday, September 10, 2007

Highlights


This is one of those images where I was happy with the original but it wasn't saying anything in particular. It would/will make a great stock image, but it wasn't particularly compelling as art.

Then I cropped it and that was an improvement, a simplification, focusing the clear attention on the model, but it was still not what I wanted. Then I made a high contrast tritone, and I was really grabbed by the highlights and contrast in her hair, and decided to mask out everything else.

Finally, I put the image on Flickr and didn't like the lack of any framing, so I added a border (I'm into border effects these days, can you tell?).

This was shot with five lights, arranged in sortof an arch around the front of her... the outer two lit the background and filled her sides, the inner two provided accents and shaping on her face, and the middle one was my (new!) ringflash at very low power, for some final fill.

Tower Triptych


For whatever reason, I'm really digging diptychs and triptychs (and series for that matter) these days. There's something interesting to me about multiple views of something, or even the same image, repeated in different ways, as seen here.

This is made up of three different processing approaches to one image, with some interesting border effects. I expect to print this one big and stick it on a wall somewhere.

The left is a saturated color processing, the middle black and white, and the right is a cyan, brown, and black tritone. The three together with the asymetrical border add up to more than any of the individual images, IMO.

The building is the Williams (formerly Transco) tower in Houston.

Friday, September 07, 2007

Moment


I really like this shot... it was fun to do something different... I shot this using my strobes as hotlights... i.e. with the modeling lamps only, no strobing. Since the modeling lights can track the strobe's power setting, I can adjust its output (though of the three, two were at full power).

The lamps are 150W quartz bulbs... to camera left, just out of the frame, one lamp is in a medium softbox (full power) and another, at half power, has a 20-degree grid on. To camera right, a silver umbrella with a full power lamp. The lights behind him are the way out-of-focus lights from my dining room chandelier.

The coolest thing here was the exposure... this was shot at f/2.8 on my 70-200 f/2.8 lens at 1/20th of a second, handheld. It's in focus, but not crispy sharp, I think that's a beautiful look.

This was loosely inspired by the recent Lightsource interview with Mark Robert Halper.

Monday, August 27, 2007

The Gossip


This was a fun shoot. I did a loosely "back to school" themed shoot on Saturday, with the intended output being a series of diptychs and composites, not so much individual images. This pairing worked right away, the images were shot close together and with intent, especially the one on the right.

Lighting for both shots consisted of a beauty dish as key light, an umbrella for background and fill, and two gridded accents (one on her, one on the background).

Other than removing dust, I didn't adjust anything on these... it's good (not required) to get things right in-camera.

Friday, August 24, 2007

In a Strange Land


I really dig this image... I tend to go for warm, sepia tones, but this cooler tone really works for this image. The tone was added in CS3's B&W adjustment layer. I added the border to compensate for Flickr's white background, but I think it adds something to the image too. The vignetting was the final touch that pulled it together for me. My only wish is for a wider lens... this would've been fantastic with a 16mm or even 10mm.

Tuesday, August 21, 2007

One Light


As is routinely pointed out on the Strobist blog, you can do an awful lot with one light. This shot was taken with a single studio strobe and a shoot-through umbrella, very close to the subjects (myself and my son). The umbrella is barely out of view.

This is also a testament to what can be done with Aperture... I had configured the light just for me for a headshot and so had it much closer. My boy hopped up and wanted a picture so I just pushed the light back until it was out of the frame... this resulted in a very underexposed frame. With Aperture's RAW fine tuning, I was able to decrease its "boost" and reduce contrast, thus making the massive increase in exposure less harsh.

This was finished in Photoshop CS3, with the B&W conversion and minor retouching in the shadow noise.

Saturday, July 14, 2007

There Are Days...


...when I wonder why I bother heaving my camera bag onto my shoulder. This is one of those days. None of my images were selected for the Houstonist photo show, and that's pretty disappointing, and honestly, bewildering, given some of the images that did get chosen. I look forward to going to the show, and I'm glad that something like this is going on, but it is still very disappointing. Obviously, the decisions are up to the judges, but I think it is reasonable to be disappointed.

These images are the three I submitted, FWIW.


Tuesday, June 26, 2007

Shape: Light and Distance


I'm doing the Strobist Lighting 102 course / exercises, and I the distance exercise is really valuable, I recommend everyone go read the post and do the exercise. The direct link is here.

So the exercise to the reader here is: what color is the actual background material? That's right, it's white foam core, and it's only 5 feet behind the vase. But (and here's the a-ha moment), the light is only 18 inches from the vase. So the light it casts on the background is much less intense than the light it casts on the subject (insert inverse square law here).

You can click on this image if you want all the lighting details.

Thursday, June 21, 2007

Duotones


I'm loving duotones. It's been a while since I applied the technique and it's nice to come back to it. Duotones (and tritones and quadtones) are incredibly flexible ways to render monochrome images. Traditionally the technique is used in conjunction with printing, but I love the control and the huge range of possibilities. I don't know of another way to achieve the same results with as much consistency.

So my process is to first convert an image to B&W, either in Aperture or using CS3's B&W layer... then I convert to grayscale, then to 8 bits per pixel, and then to duotone. I'm defining my own duotones as I go and saving them, so that I build a library of good combinations. Finally I convert the image back to RGB color.

I liked the results on this one in particular.

Tuesday, June 19, 2007

Composition


I'm really trying to work on composition these days... Houston Photobloggers did a photo walk in downtown Houston on Saturday, so I took the opportunity to try and focus compositions, shooting the whole time on my 70-200mm f/2.8. The long lens forced me to see differently than I might with something wider.

I really like this shot of Cabo's outside wall... I loved the relationship in placement of the two objects and the similarity in appearance, despite their being for entirely different purposes. And the wall color is killer, too.

Monday, June 04, 2007

"Church"


This was just too good to pass up. This is a little church in Stafford, TX (near Houston). The same building could easily be found in a small town nowhere near the big city, it looks like a little country church.

I processed this with CS3, using a black and white layer, a couple tint layers, two layers of "grain" (Add Noise filter) and a couple layers of curves adjustments. I think it successfully adds to the feeling that this could be a little country church.

Tuesday, May 29, 2007

Toning


I'm really into toning these days, especially toning a series (also see The Series as Art on Houston Photobloggers). Some images are just made for a particular tone or treatment. One of the things I love about shooting digital is the ability to experiment with tone and "developing".

This image was "developed" using an infrared-simulating black and white conversion layer, followed by two toning layers and some contrast adjustments. The tone fits the style of the building and the brightness and contrast of the image.

Sunday, May 06, 2007

Windows


Everyone is probably familiar with the notion of the eyes as windows to the soul. I find this particularly evident in children, especially my own, because I know them so well. Well-captured, well-lit eyes lend so much depth to a picture. The eyes allow you to connect, to imagine who the subject is, maybe what they're thinking.


Anyway, this isn't just about eyes, it's also about a new toy... I got a Lensbaby (the original). I got the original primarily because I wanted the most low-fi version they had. I want the dreaminess turned up to 11. So far (I've had it for 8 hours or so), I love it.

Both of these images were processed in Photoshop CS3, primarily using the new Black and White layer.

Monday, April 23, 2007

Speed


Sebastien Bourdais in qualifying for the Grand Prix of Houston. The yellow and black sponsor banner in the background provided the perfect backdrop for this car in particular. It was just a matter of actually catching the car in the right spot, in focus, with the right blur, etc.

These cars go really, really fast. Watching them on TV just doesn't give you a clue. This was the fastest point on the track, too, which helped because it was impossible to capture the car in focus and not blur the background.

Having said that, there was a little technique here... I was shooting in aperture priority (I usually shoot in manual, but here you don't want to have to manage exposure, the camera can do a fine job), with a small aperture (like f/11 or greater), to force the shutter speed low enough to get the blur (e.g. 1/200th or so). At a wide aperture, the shutter speed would have been much too fast to get a good blur in the background. I shot in aperture priority (instead of shutter priority) so that I could quickly switch modes and capture a person or other slow-moving subject with shallow depth of field.

Friday, April 13, 2007

Shine


Sometimes you make an image and you know there's something there, something you want out of it, but you don't actually know what that something is yet. This was one of those. I kept working it until it was radiantly bright, and then I had it.

The lighting was keyed with a 48" octobox... I had a silver reflector for fill, a grid on the backround and two more for accents on her hair.

Initial processing done in Aperture, as always, but turning this totally high key and B&W was all Photoshop CS3 (the original is fairly bright, but nothing like this). The border is done with a layer style... it just added more of a sense of radiant brightness.

Monday, April 09, 2007

Gaze


This is all about tone. Creamy skin and warm brown tones, gradients, and rich shadows without extreme contrast.

I think it's very tempting to push images to the limits of contrast, saturation, etc., but the images that keep drawing me back in are the ones that are smooth and beautiful and have sweet tone, like the tone of a simple tube amplifier.

This image engages me, I'm interested in it photographically but I'm also interested in the person, it isn't just an image nor is it just a portrait, it's something in between. There's a mix of mystery and beauty and light and shadow.

Tuesday, March 20, 2007

Close


This was an experiment in processing. There's been lots of noise on the net about the image processing that went into the movie "300" and trying to reproduce that look. So I was messing around with some ideas and then went a bit of a different direction. So there's a fair bit of Photoshop going on here.

The crop really emphasizes the title, "Close". It feels claustrophobic and forces you to deal with the intense stare. It also has an incompleteness that adds interest for me (the crop above the chin, for example).

As an aside, Photoshop CS3 really rocks.

Monday, March 12, 2007

Snow Patrol


Not a whole lot to say here except that I wanted this shot and waited for it (and took lots of attempts). People move rapidly at concerts, turns out. I really wanted the streaming blue light with one distinctive pair of hands raised with the lead singer out of focus.

Concert photography may push me over the edge for an 85mm f/1.2. My 70-200 f/2.8 is a fabulous lens but another 2 stops would be huge. This was ISO 800... my 10D (yes, due for replacement) is significantly better at 800 than 1600.

Friday, March 02, 2007

Iain


This was shot with a white foam board background and one beauty dish. 1/250 @ f/16 probably. The beauty dish is just above his face and the camera is right under the dish, maybe 2 ft. away. I like the tones in his hair and his expression.

I'm going back and forth on the highlight in the upper left. At this small size, it bugs me a little, but full screen (in a better color profile) I really like it. I have a second version where I Photoshopped that out with a gradient. For the moment, I'll go with this because it's how I shot it.

EDIT: OK, I like it this way. On the dark background it works for me. On Flickr's white page it was bugging me.

Wednesday, February 28, 2007

Relax


Probably the last one from this series that I'll post... this one is growing on me. It definitely works better in black and white. I love the contrast along the underside of her right arm, and I love where her left hand is. I keep looking at this one... there's something mysterious and unidentifiable that draws me in.

Same four light setup as on the others (beauty dish + 3 grids).

Friday, February 23, 2007

Focus


This is a square crop of "Focus" converted to high contrast black and white. I really like the color versions of these but this one in particular I think lends itself to B&W and a square crop. The B&W forces you to deal with shape and tone and contrast and the square crop further enforces the symmetry.

Again, four lights... beauty dish + three grids. I did the B&W in Aperture after touchup in Photoshop (I prefer to do as much as possible in Aperture because it changes no pixels).

Focus B&W #2
I've also done a high-key version of this, shown here. I think I prefer the darker, higher contrast version, but the high-key has its own appeal. I like the silver hair and the barely detectable outline of the face. The high-key treatment was done in Photoshop so I could preserve some contrast on the eyes, lips, and brows.

Monday, February 19, 2007

Low Key


This is one of my favorite images from my shoot with Rebecca. I was definitely going for an old-Hollywood kind of look and I planned to go B&W. This was done with three grids (two 10's and a 20). I've done shots like this before but I didn't do as much lighting. What make this shot for me are the accent light on her hair and the background. I think the image would be much less interesting without the accent from behind.

Blogging Here Again

I think this will be my photoblog of choice from now on, so I'm catching up with a few images from the last few months. I'd like to post images along with some discussion of how they were created, as well as other photo-related posts. But mostly I'll focus on images.

Soft


This is a pre-post-production image from a recent shoot with a local model-hopeful. This was done with four lights... a beauty dish provides the key light on the model and three grids round out the lighting... two grids on the model and one on the background.

I'm learning that I really like lighting with grids. Grids give you alot of control and you can really "construct" lighting. I find it easier to achieve three-dimensional images by constructing light with grids than bathing the subject in softboxes. The beauty dish lent a quality to the image that I've not gotten any other way so far.

I have a lighting diagram for this shot on Flickr... click the image to visit the photo on Flickr, there's a link to the diagram in the description.

Steve Parsons B&W #2


A second shot from the same shoot. This is probably my favorite, I love the tones and the pose.

Steve Parsons #3


This was a promo shot for a musician friend. I shot this with two lights, a medium softbox on the subject and a grid on the background. A little saturation and dodge/burn layers made the colors and local contrast really pop.